Introduction
After several years of enjoying the work of others on HyperScale
I thought it was high time I submitted an article of my own.
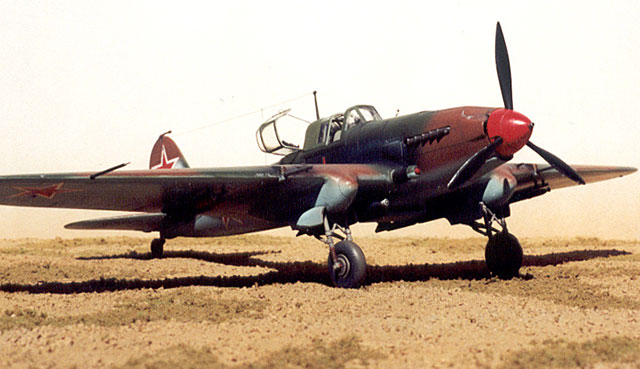
Recently I completed Accurate Miniatures IL-2m3 Stormovik and
decided this was the kit to write about. At this time I only have
the one display base for my photos so please excuse the desert
background!
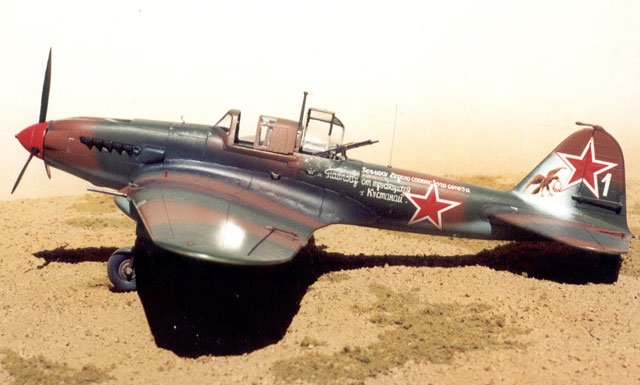
Accurate Miniatures' Stormovik
Accurate Miniatures' Stormovik is a superbly engineered model but
not without its quirks. I found that it often took me numerous dry
fittings before I was able to work out how many of the components
were designed to come together. Once I did "bang the rocks together"
I was always pleased with the fit and the clever thinking that
obviously went into the creation of this model.
I began the project by collecting the components and reference
materials I would need. In addition to the model itself, I added the
Eduard upgrade set, although in the end only about two thirds of
this set was used. An excellent set of decals was acquired from
Aeromaster, sheet #48-200, and I chose to use these for the aircraft
flown by Ivan F.
 Pavlov.
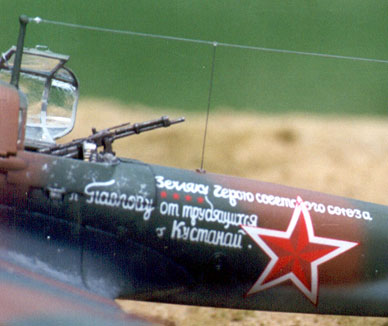
According to IL-2 Stormovik in action, the inscription reads "To
the compatriot Hero of the Soviet Union comrade Pavlov from the
workers of the city of Kustanaj." I have always loved the
inscriptions on Soviet aircraft, which I believe add a great deal of
character. I used IL-2 Stormovik in action from Squadron
signal and another reference book which anyone building the IL-2
cannot be without, IL-2 Type 3and IL-10 / Avia B-33 in detail. This
is basically a walkaround book featuring the Il-2 at the museum in
Prague. I bought the book while visiting the Prague museum several
years ago, a “must see” if you get the chance. Directions to the
museum are in the book.
Pavlov.
According to IL-2 Stormovik in action, the inscription reads "To
the compatriot Hero of the Soviet Union comrade Pavlov from the
workers of the city of Kustanaj." I have always loved the
inscriptions on Soviet aircraft, which I believe add a great deal of
character. I used IL-2 Stormovik in action from Squadron
signal and another reference book which anyone building the IL-2
cannot be without, IL-2 Type 3and IL-10 / Avia B-33 in detail. This
is basically a walkaround book featuring the Il-2 at the museum in
Prague. I bought the book while visiting the Prague museum several
years ago, a “must see” if you get the chance. Directions to the
museum are in the book.
Construction started with the cockpit where many of the Eduard
components were added. Though this set does improve the detail of
the cockpit, once completed the opening is so narrow that little can
be seen as the canopy covers much of the cockpit even in the open
position. The basic interior color I used was RLM 02 lightened with
white. I elected to use the kit instrument panel as I feel the
Accurate Miniatures panels are hard to beat but the Eduard seatbelts
are a “must have”. The kit features a long control rod extending
from the control stick which needs to be threaded through a hole on
the aft bulkhead in order for the cockpit to be fitted. This is a
good example of how dry fitting is essential in the construction of
this model as this is a bit tricky at first. More than any other kit
I have built, the directions need to be followed exactly.
The cowling is a separate component and has a very clever assembly,
which needs to be fitted into the topside to create the air intake.
This was one of the toughest components to fit, as it is a bit
difficult to visualize how this step is supposed to go. Once I got
the thing aligned, it all came together very well. It was at this
moment that I realized that the engineers of this kit were much more
clever than me.
The wing fairing is cast as part of the upper wing rather than the
more conventional fuselage side. This creates a very tight fit and
requires no filler. Care must be taken however with gluing as the
cement can easily be squeezed out and mar the skin as I found out.
If you are cleaver, you will follow the directions exactly and this
will not be a problem. Again, dry fitting here is essential. Before
sanding, be sure to remove the counter weight from the top of the
rudder as this is all but guaranteed to be broken off. In the end,
despite my care, it was broken off and lost. A replacement balance
weight was made from brass wire with CA glue and filed to shape.

I dipped the canopies in Future floor polish and masked them with
liquid mask before they were attached. Attaching the canopy at this
time is necessary especially for the forward windscreen, as it needs
to be sanded and filled at the rather heavy aft frame. This will
also allow the camouflage pattern to align correctly with paint on
the airframe. Here is a safety tip, DO NOT put liquid mask over a
canopy coated in Future and then let it sit for about six months!!!
While Future will give you a brilliantly clear canopy, when the mask
was removed some of the floor polish was pulled up along with it
resulting in glass that would have looked much better had it been
left alone. On my next kit I will use more conventional masking and
apply the Future once it is removed. Live and learn.
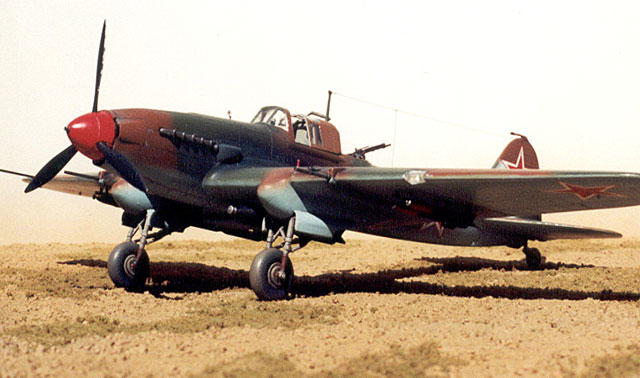
Painting
Almost all of the model was painted using Polly Scale paints, a
product I have had a lot of luck with but one that is becoming
increasingly hard to find here in Wisconsin. One thing I have
learned about using Polly Scale in an airbrush is that by filtering
the thinned mixture several times prior to applying it will result
in a much more user friendly paint. No masks were used for the
demarcation lines, as I wanted a very soft transition from one color
to the next. On page 30 of IL-2 In Action, there is an excellent
photo of how soft these lines were. The colors I chose were selected
by “eyeball” rather than the instructions. The colors selected ended
up being US earth red, NATO TRI green and a much-lightened USSR
underside blue. This is not exactly a scientific method but one that
felt right to me in this case.
A coat of future was applied and then the panel lines were added
using a technique I have not tried before that I got from Fine Scale
Modeler, November 2001. Basically, a wash of Polly Scale paint,
water and liquid dishwashing detergent is used. Once applied, the
excess is wiped off with a cotton swab. Several shades were used
ranging from medium gray to black depending on the background and
component being painted. I was very happy with the result and will
use this technique again. The white area on the tail was painted at
this time, and once dry was brushed with steel wool to create a
distressed look.
Decals
Next the decals were applied starting with the eagles on the
tail.
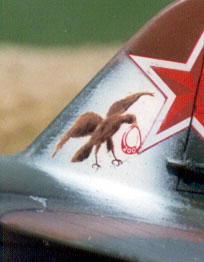 I
have always felt the decals of artwork on aircraft seldom look very
good so I took a moment to repaint the birds by painting directly
onto the decal with many different shades of Polly Scale paint and a
very fine brush. This gives the decal a hand painted look and is
therefore more convincing.
I
have always felt the decals of artwork on aircraft seldom look very
good so I took a moment to repaint the birds by painting directly
onto the decal with many different shades of Polly Scale paint and a
very fine brush. This gives the decal a hand painted look and is
therefore more convincing.
The artwork was then given a coat of clear gloss before being
applied to the model in the usual way.
The rest of the decals were added and went on with no difficulty
including the large inscription on the side despite the heavy step
between the fuselage and the aft gunners armor. The decals were
sealed with another coat of Future and, once dry the entire model
was painted with Polly Scale clear flat. Weathering and the exhaust
streaks were made by mixing RLM 66, black and a great deal of clear
flat paint. This translucent paint allows itself to be built up in
layers and is much more forgiving than other techniques.
Finishing Touches
The antenna wire was made from a very fine surgical steel wire
normally used for rigging 1/72 biplanes. Though this was very easy
to use and looked great at first, I found out later that it has a
tendency to expand and contract with temperature. I haven’t decided
weather or not I will use this technique again. Other details added
include a landing light made by turning a length of clear sprue in a
Dremel tool, landing gear locked indicators on the upper wing
drilled out gun barrels and hand holds on the side of the fuselage
made with copper wire. In addition, the pitot tube was replaced with
one made from plastic and brass wire and the aft navigation light
was made from stretched clear sprue.
Conclusion
I am very happy with the quality of the Accurate Miniatures kits
and look forward to building many more of their models. The stack of
future Accurate Miniatures kits in my basement yet to be built is
proof that when it comes to money well spent, Accurate Miniatures is
a great value. With luck, this superb kit will be available again in
the future.
 Click the thumbnails below to view larger pictures: