Introduction
I built this Oscar 4 years ago and it was my first aircraft modelled
after a hiatus from the hobby of about 15 years. I started back with
a Panzer IV so I could practice up on my techniques especially the
weathering not wanting to waste good money learning on precious
aeroplanes.
Construction
Aftermarket Products Used:
Eduard PE set (49 202) Ki-43 II
Oscar
Cockpit / Fuselage
I began with the cockpit and there is a load of PE to go in here
(almost a full replacement!). This being my first experience with PE
and superglue it took a while to get the hang of things and not glue
myself permanently to the kit. It all looked pretty good once
painted. The tail wheel poly-cap attachment set up was discarded in
favour of something more permanent.
Engine and Cowl
The engine also took a while to construct as there are lots of tiny
PE bits to add besides the electrical harness spark plug leads.
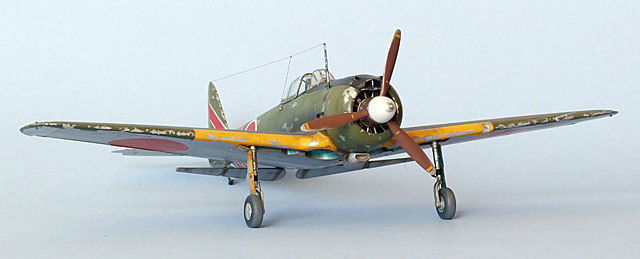
Note: You have to be careful fitting the engine and cowl otherwise
they will easily get off-centre.
Wings
Fit of the wings is good except for the usual putty needed at the
underside fuselage join. Pitot tube replaced by brass tube and wire.
I also cut out and repositioned the ailerons, elevators and rudder.
Little Bits
The landing gear doors involve lots of tiny PE bits and were a trial
of patience and anger management. Exhaust pipes were dremelled
deeper and a correct narrow roll over bar installed.
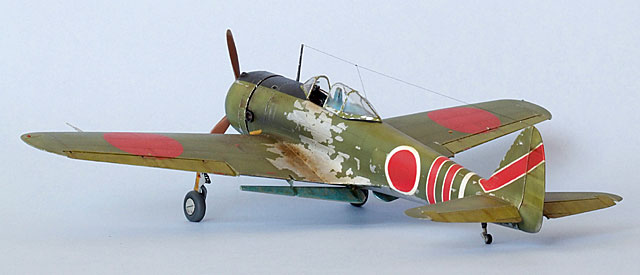
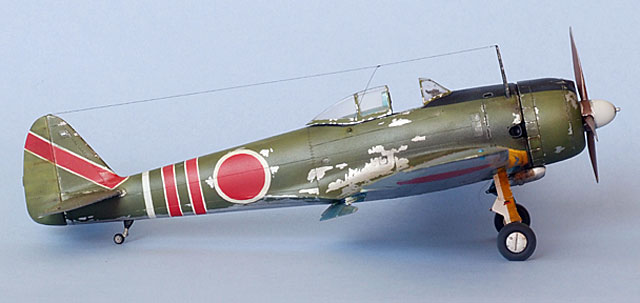
Painting and Markings
I decided not to go with the kit schemes as I wanted something not
modelled before and besides the “white” decals were too yellow for
my liking. The scheme I chose is an aircraft from 59th Sentai
piloted by Capt. Shigeo Nango, But Airfield, New Guinea, Sept 1943.
Details can be found in Osprey Aircraft of the Aces 13. Japanese
Army Air Force Aces 1937-45.
I started with the wheel wells and manoeuvring flap wells which were
painted Aodaki Blue and then masked. Next I sprayed the undersides
in MM Aluminium Plate Buffing Metalizer which was also continued
onto the upper leading edges and fuselage and wing roots near the
cockpit for later chipping. This was then buffed using a soft cloth
and sprayed with MM Metalizer Sealer. I then masked up for the top
coat MM IJA Green which was post shaded adding more H226 and white.
The fabric surfaces were lightened even further.
Upon removing the masking I find that the tape pulls up the
aluminium coat (almost back to plastic in some places). This could
be due to it being buffable (like a coat of dust) and so not really
a solid paint layer. I resprayed some areas later after first
masking and painting the Hinomarus and stripes.
The anti-glare strip, leading edge stripes and propeller were also
painted at this stage then the model was then given a coat of satin
varnish before weathering commenced. The canopy was masked using
Bare Metal Foil and painted during the above process, so too was the
propeller using Humbrol H160 German Red Brown.
All paints used are enamels and my mixes are as follows:
Decals
The only decals used were the “NO STEP” and trim tab markings
everything else is masked and painted.
Weathering
I started with an overall wash using a mix of raw umber and burnt
sienna oil paint thinned with turps. This was applied with a wide
brush being very careful not to go over the same place twice or it
would wipe off the underlying paint – which of course happened
several times. This method is interesting in that the wash will
actually stain the paintwork giving it a very realistic weathered
look.
Chipping came next and I began by using Tamiya tape to remove large
sections of the upper green paint by burnishing it down and ripping
it off quickly. Luckily it was buffable Aluminium underneath
otherwise I don’t think this method would have worked. As expected
some Aluminium areas had to be resprayed with the edges of the large
patches and fine chipping done with Tamiya XF16 Flat Aluminium and a
fine brush. There were many patches resprayed (sometimes more than
once) due to various disasters.
A few oil stains were also drybrushed and exhaust staining done with
Tamiya X19 Smoke. A matt-ish varnish was then sprayed onto the green
areas and more MM Metalizer Sealer onto the bare Aluminium.
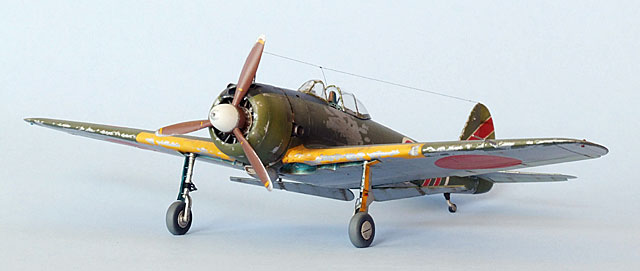
Final Assembly
All the small bits now get attached: Tailwheel, PE landing gear
doors, landing light (which I find is way too small and too
problematic to fix now that painting is complete) – I bung it on
anyway, manoeuvring flaps are positioned wrong on my model (outer
portion sticking out way too far) mainly due to lack of references
and poor instructions in the Eduard PE set., canopy, propeller (this
is where I find out that the engine is off centre), aerial mast and
wire.
Conclusion
It ended up being a fair bit of work for my first super detailing
experiment and I sure learnt at lot of things not to do. After
having a good look again at the model when writing this article I
can see that I might have to build another to make up for all my
shortfalls during the learning process - or maybe I’ll just rehash
this one…