A Little Hypothetical History...
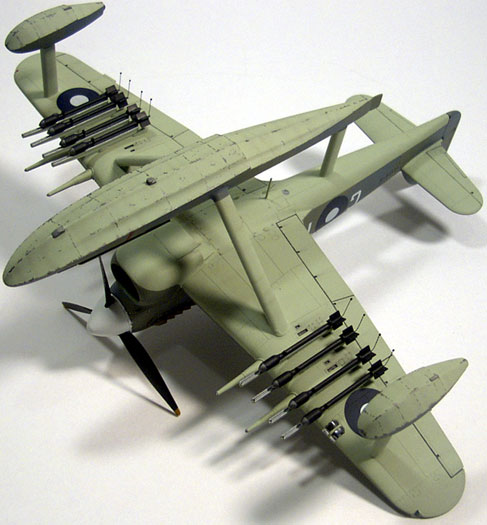
Derived from the Typhoon 1B, the little known Monsoon was developed
to supplement the RAF Coastal Command’s flying boat fleet with a
hard hitting fast attack fighter to counter the German E-Boat
threat. Armed with 4 20mm cannons and 8 127mm rockets, the Monsoon
was a very capable weapons platform.
Unfortunately, under service conditions, a recurring problem soon
became apparent. The very large chin radiator had a nasty habit of
taking on water during take-offs and landings, which would create a
dangerous nose heavy condition. This often led to the aircraft
engaging in spectacular somersaults and cartwheels. Eventually all
were retired and scrapped without a single example surviving.

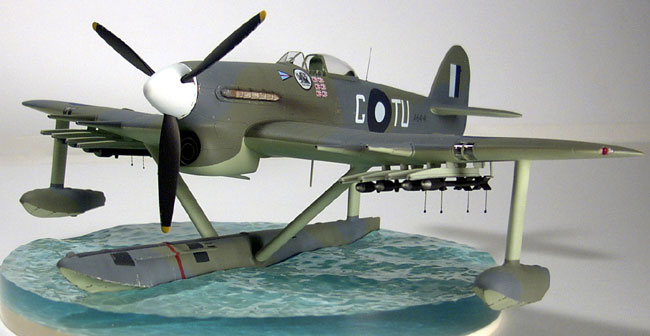
The aircraft modeled depicts one of 12 Monsoons delivered to the
RAAF’s 107 Squadron to supplement their Vought OS2U Kingfishers in
the anti-shipping role, the first hunter/killer team used in combat.
It was flown by Wing Commander G A “Tup” Tupper, one of Australia’s
most colorful aces. His personal marking was a vulture with the
motto “Watch This” inscribed beneath.

Construction
This project began with my model club’s group build featuring the
Hasegawa 1/48 Hawker Typhoon Mk.1B kit. Since the Typhoon really
didn’t sport many different color schemes during its service life,
and I didn’t have much interest in adding a plane Jane gray/green
over gray model to my collection, I decided to do something a little
bit different. I happened to have a spare Monogram 1/48 OS2U
Kingfisher kit minus wings. So I started sketching what a floatplane
version of the Typhoon might look like. It pleased me enough to
start cutting the floats off the Kingfisher and placing them with
the fuselage of the Typhoon to get an idea of positioning, strut
length and such.
The first order of business was to eliminate the landing gear
openings. This was done by grinding away the gear wells with a
Dremel moto-tool and taping (from the outside) the gear doors in
place flush with the wing surfaces. I then back filled the door area
with one of my favorite modeling materials, dental acrylic. This
liquid and powder mix yields a wonderful putty like material that
can be spread onto styrene plastic and will harden to a very similar
consistency. Next time you visit your dentist, inquire as to where
he purchases this stuff and ask if he’ll order some for you.
Dentists use it for creating temporary crowns and such.
Anyhow, after the doors were firmly in place, I sanded down the
outside of the wing and filled it with putty (I prefer 3M Blue Acryl
Surface Putty) and got it as smooth as possible. I then re-scribed
the panel lines to give the appearance that the doors never existed.
I did this with a small metal ruler and a sewing pin chucked in a
pin vise, and a lot of patience. The tail wheel opening was just
filled with dental acrylic and sanded/filled/re-scribed in a similar
fashion.
Next I assembled the fuselage and wings. Then it was time to start
the float strut placement and mounting. I drilled a 1/8 inch hole
through the top and bottom of the fuselage halfway between the
cockpit and tail and glued a piece of Evergreen 1/8 inch tubing in
place. The top was filled with more (you guessed it) dental acrylic
and sanded smooth. Then I located the area on the wings where the
struts would mount and drilled more 1/8 inch holes through the
bottom of the wing only. I then glued in more 1/8 inch tubing and
cut it off flush with the bottom of the wing.

To fashion the struts, I first cut a piece of 1/16 inch brass rod to
the correct length for the fuselage strut and then soldered a piece
of KB Brass airfoil tubing to it. When I had the float in place
relative to the fuselage, I measured and cut some equal lengths of
1/16 inch brass rod and using some needle nose pliers bent the ends
to match the angle that the strut would meet the surfaces. Again, I
soldered some brass airfoil tubing to the rod filing the ends to
match the angle as best I could. The wing tip floats were done
basically the same way.

Painting and Markings
At this point, I painted the entire model using
Model Master Enamels. I decided to go with the maritime color scheme
of Dark Slate Gray and Extra Dark Sea Gray over Sky for some
variety. Then the model was sprayed with Polly Scale Clear Gloss in
preparation for decaling. I decided to go with RAAF markings after
reading about the 18 Kingfishers delivered to the RAAF for
anti-submarine and shipping patrol. The decals came from a
Suprescale International RAAF Spitfire sheet and an old Aeromaster
PBY sheet. The serial number was obtained by cutting and re-placing
the Spitfire codes and the A64 fuselage code was in fact an un-used
RAAF code from WWII. The Fuselage call letters were also cut and
re-matched from the Spitfire decal sheet. The Vulture was printed
from my computer from artwork created by the late George Tupper
(Ming the Merciless to us Hyperscalerers), one of my club members
who passed away last fall. I decided that since the Typhoon was one
of his favorite aircraft, I would build this model as a tribute to
him.

Once all of the decaling was done the model was given a final coat
of Polly Scale Clear Flat. The major components were then assembled
and the final details were added, including antennas, rockets and
canopy. Some weathering was added using Tamiya Metallic Gray and
Testors Steel for the paint chipping and Floquil Grimy Black for the
exhaust smudges. Since I am not a fan of the technique, no pre or
post shading of any sort was done.
The base was created by first sculpting the water with Kleen Klay
brand modeling clay including the impression of the main float. From
this an RTV Silicone rubber mold was poured. Into this mold, some
clear casting resin slightly tinted turquoise in color using dye was
cast. After this material cured some tan colored resin was poured on
top of the clear to replicate the sandy bottom. This was then
glossed up with automotive 2 part clear coat sprayed through my
airbrush. When dry, this gives a very “wet look” appearance.
The model can be removed from the base easily for inspection, or to
pretend to fly around the room in search of the pesky German U-boats
and Japanese barges! Brrrmmm