Background
The P-47 needs very little said about it so I will concentrate on
Francis Gabreski. Gabby was at Pearl Harbor when the Japanese
attacked on December 7th. Trying to gain combat experience Gabby
convinced someone to let him fly with the Poles out of England.
Gabby grew up in Oil City, PA in the Polish section of town and
spoke the language fluently. He was transferred to Europe but 8th
Fighter Command did not want to let him go to the Polish squadron.
He was able to work the issue from the Polish side of the house.
Soon he was flying Spitfires with them. Once he was integrated back
into the 8th Air Force he was assigned to the 56th Fighter Group.
Initially he was shunned, as he was an outsider. The 56th, Zemke’s
Wolfpack, had developed back in the US and trained up together. As
Gabby had rank and experience he was given command jobs, which
didn’t sit well with the people of the unit. Eventually his ability
and leadership would win them over. His score increased steadily and
soon he was pushing for the ace race. He had 28 kills when he was
scheduled to rotate back to the States for a war bond tour and get
married to his fiancé’ Kay.

With bags packed and an airplane waiting to take him home, Gabby
heard of another mission in which he thought there would be a chance
to increase his score even more. He was able to arrange to lead and
fly the mission. While there was no air-to-air activity, Gabby
noticed an airfield and led his section down for the attack. He made
the first pass with no problem despite the defensive fire. He turned
around and went down one more time. During this pass Gabby mushed
into the ground and eventually had to make a belly landing. He was
captured after a few days and spent the remainder of the war
watching from a POW camp.
He was eventually married Kay and had a couple of kids. He worked
various jobs in the military but he eventually went to the Korean
conflict in July 1951. Gabby helped develop the tactics that helped
him, and many others, become a jet ace with 6.5 jet kills.
He finally left the service and retired in NY. Sadly, Gabby died on
January 31, 2002.

The Model
Why Gabby’s P-47? Well, I was commissioned to build one and I
like to build one for myself to test out paints and techniques. So
that is all the motivation that I needed. The Tamiya P-47D is a
fabulous kit and lots have been written on it so I won’t write
anything else. I will only mention the areas that I upgraded or had
issues with.
The first place was the fuselage join on the bottom along the keel.
It is a pain to clean up and retain the panel lines and rivet
detail. The other issue is the fuselage drop tank sway braces, parts
G1 and G2. They don’t fit as well as I expected. Filling them was a
big pain, especially since the one model would not have any drop
tanks on them.
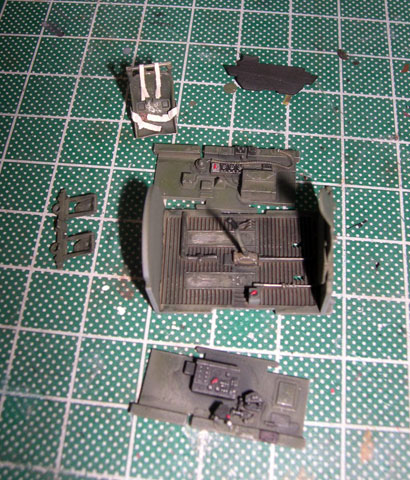
Cockpit
The kit cockpit is very nice but it can use some details.
Ultracast to the rescue. They have a seat with molded on seatbelts
that are excellent. The other thing that I did was to use the Eduard
instrument panel. The panel is much nicer than the one in the kit. I
thinned down the kit panel and used the photo etch front of it. This
allowed the kit gunsight to be used and ensured the fit was perfect.
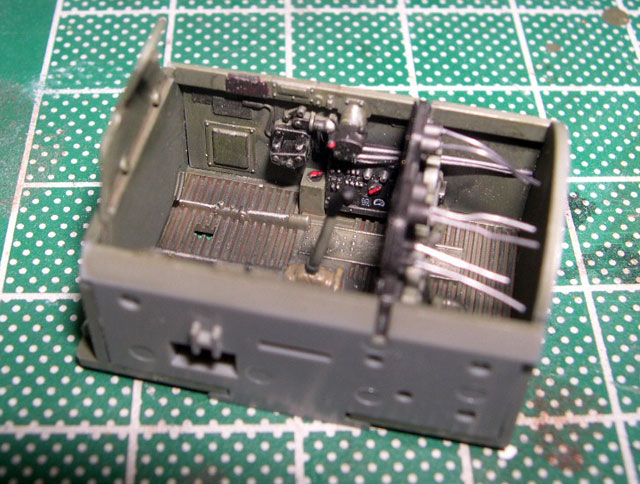
Some rods and a few other photo etch parts and the cockpit was
ready for paint. I used Humbrol Bronze Green. Then I washed the area
with Burnt Umber and dry brushed with interior green and silver
paint.
Fuselage
The fuselage is nice and the layout is exceptional but there is
room for improvement. The enhancement set from ScaleQuest addresses
the see through areas such as the intercoolers and the exhaust
gates. This simple resin enhancement set is essential if you ask me.
The engine cowling deflector is beautifully rendered. The resin is
perfect and bubble free. I got mine from Eagle Editions. You have to
ask them for it but they still have some left.
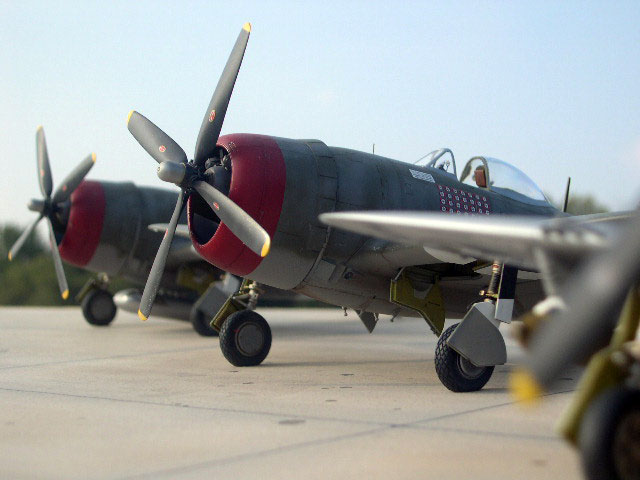
Engine
The engine is beautiful out of the box but the Eduard set of
ignition wires adds a nice touch. The engine cylinders were painted
flat black and then dry brushed with aluminum. The crankcase was
painted neutral gray.

The open cowl flaps from the ScaleQuest set fit perfectly and
when assembled with the Eduard actuator rods the look is realistic.
Elevators
I needed to reposition the elevator. I carefully scribed through
until they were removed. Then it was just a matter of repositioning
them to where they looked good. Don’t forget to offset the stick in
the cockpit.
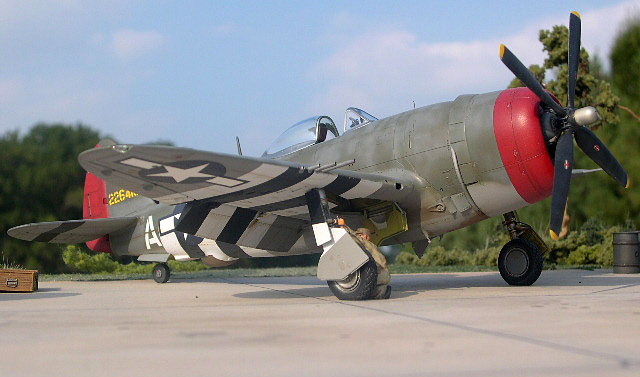
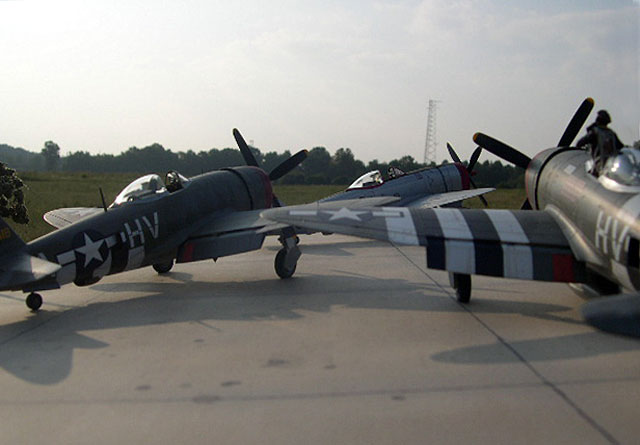
Wings
Luckily for me Gabby’s airplane did not have any pylons under the
wings. The wings went together perfectly. I used some Bare Metal
Foil on the landing light. I pushed it down with a cotton swab. Some
of the Eduard set was used to update the flaps and the wheel wells.
Some solder was added to the wheel wells and on the brake lines for
extra detail. Ultracast wheels were so nice that you don’t have to
drill the hole for the axle. I did have to shorten the axle by about
1/8th inch.
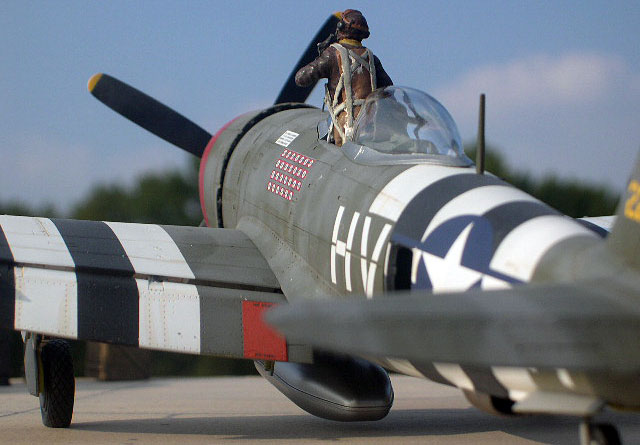
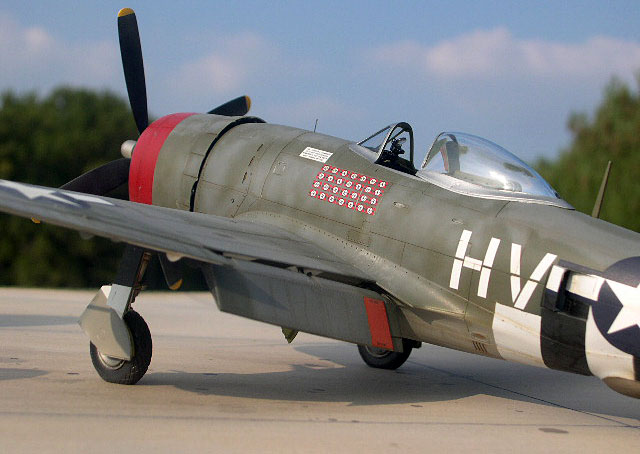
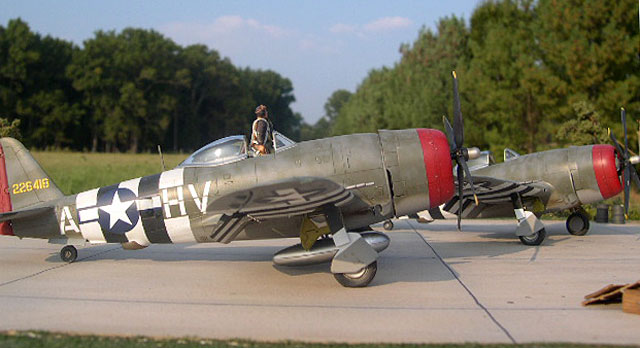
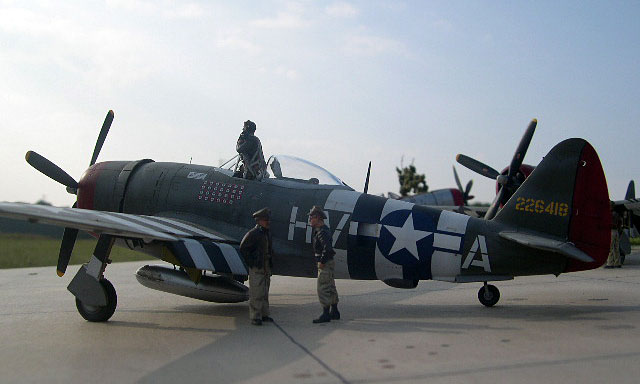
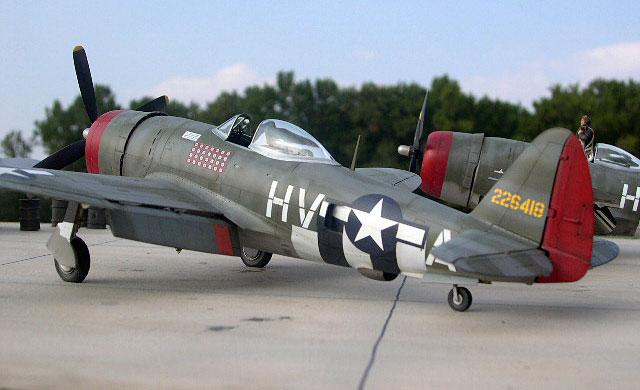
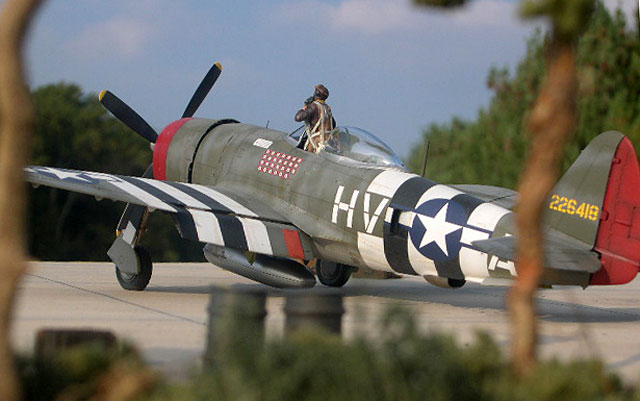
Painting
Okay, let’s start the mud slinging! There are just about as many
interpretations of the markings as there are models of Gabby’s
airplanes. Here are my findings. First off, stop thinking as a model
builder and think as a crew chief who has got to paint the aircraft
before the morning mission at 0300. As a crew chief, you do what you
have to do with what you have on hand. As a model builder you would
obviously paint the white of the invasion stripes before the black.
As a crew chief, you would paint with what you had on hand first.
After looking at the photos in the book “Gabby”, you will notice
that there are a lot of areas on Gabby’s aircraft that have
overspray. An absolute no-no for a modeler but tell that to the crew
chief at 0200 hours. For example, look at the tail number. The tail
number had to be resprayed when the rudder was painted red. Look
around the number, lots of yellow overspray. Now look at the cowl
ring on the top, same thing, overspray. The same goes for the
invasion stripes. The crew chief painted the black and then masked
the area off and sprayed the white. Of course, there was overspray.
This has been interpreted as white invasion stripes with black
outline but I’m positive that was not the case. I couldn’t bring
myself to spray the oversprayed areas but they were on the real
thing. With that said it is on to the painting.
After washing the models with Dawn dish detergent and then using
Polly-S Plastic Prep it was time to mask up the cockpit and the
wheel wells. I preshaded the entire model with Model Master Flat
Black. After that had dried, I masked off the areas where the
squadron codes would go. Then I thought like a modeler and painted
the white over the area. Once dry, I masked over the areas and
painted the flat black ones.
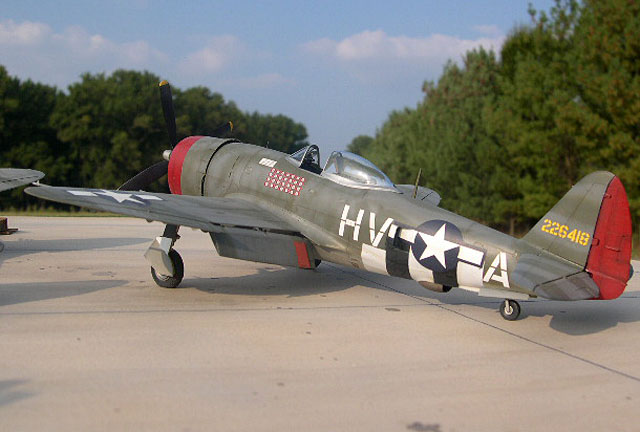
The next area that comes under scrutiny is the actual colors used on
Gabby’s airplane. It was painted in British colors of Med Sea Grey,
Ocean Grey, and Dark Green. Was the underside unpainted natural
metal or the Med Sea Grey? Your call there. I think that the bottom
was the Grey but the horizontal tails seem to be natural metal.
Didn’t know for sure but I elected to keep the bottom all one color.
I painted the bottom with Polly-S Medium Sea Grey.
Once that had dried, I painted the whole upper surface with Gunze
Dark Green. Then came the fun part. After studying the available
photos I determined that the right side was open to conjecture. The
left side was easier, but the wings and tails were difficult to
determine. One thing that I noticed is that the overpainted invasion
stripes were LIGHTER than the original paint. I would have thought
it would have been darker due to the older paint being bleached by
the sun, but pictures prove otherwise.
Once everything was dried, I masked and painted the red cowl and
rudder with Tamiya Flat Red. A coat of Future prepared the model for
decals.
The Ultracast props were beautiful. There were no bubbles and no
distortion. They were painted yellow on the tips and that was masked
off with Tamiya tape. Next Tamiya Flat Black was painted overall and
then some streaks of lightened black were sprayed. Gabby’s prop boss
was painted black as well except for the pitch change dome, which
was aluminum.
I wanted my aircraft to depict the large photo in the Gabby book so
I needed a flat drop tank and I painted it aluminum for visual
interest. I could have easily painted it Neutral Grey. While I had
the aluminum out I painted the canopy and the area on the fuselage
that the canopy would have mounted to. I masked the canopy with
Black Magic masks. They fit perfectly and made the masking process
so easy and best of all quick.
Decals
The Aeromaster decals worked well, but I did notice that the
fuselage ones were slightly smaller than the Tamiya ones. I have
heard how thick that the kit decals were, but that is a bunch of
bunk. The decals, whether kit or Aeromaster, are not opaque enough
to cover over the black and white. My solution is to apply multiple
decals.
I used Tamiya decals on my kit and they were perfect. Even with
two layers the decals were still slightly see through but they were
not thick. Everything settled down with Microsol and Microset. Once
the decals dried a coat of Future sealed them in place. This was
followed up by a coat of Polly-S Flat.
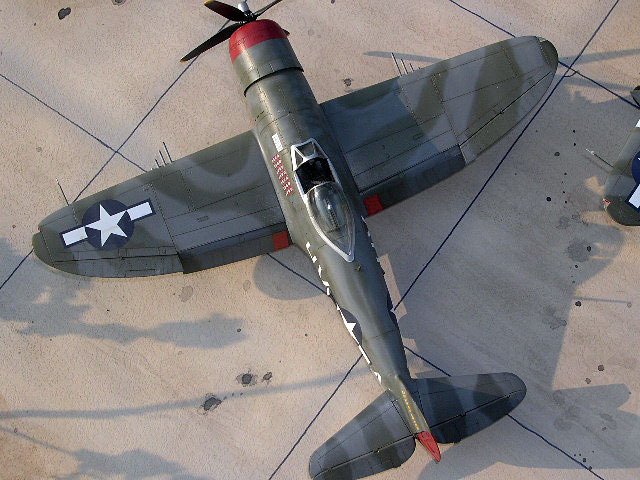
Weathering
Weathering was kept to a minimum. The first thing that I did was
add a wash of Burnt Umber artist oils. Followed up by some silver
pencil and pen to represent chipping. Some Tamiya Flat Earth and
Flat Black were added to the exhaust areas. Once everything was dry
a streaky coat of Tamiya Buff toned everything down and blended the
decals to the model. A coat of Flat blended everything to an even
sheen.
Finishing up
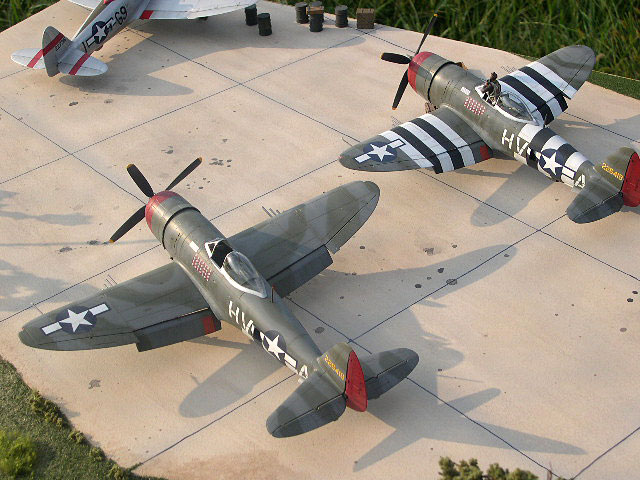
The remaining small parts were added and the airplanes were done.
Conclusions
What a great kit. The aftermarket stuff was really nice. I didn’t
use the entire Eduard set but I did use enough to justify the costs.
The Ultracast stuff was flawless and highly recommended. The
ScaleQuest set was perfect and added a lot to the finish of the kit.
Again highly recommended if you can find it. The kit itself is
fantastic and worthy of all the praise the modeling community has
heaped on it.
I can highly recommend all of the aftermarket items I used. They
all did what they were intended and worked as designed. Overall it
was a very pleasant build. The paint scheme may intimidate some
modelers but Gabby’s airplane is a historically important aircraft
of a great American fighter pilot.
Accessories
Black Magic P-47D Bubbletop Canopy and Wheel Hub Masks CEBM48544
ScaleQuest Tamiya Thunderbolt Enhancement Set SQ-001AP
Ultracast P-47 Thunderbolt Seats 48017
Ultracast P-47 Hamilton Standard 4-Blade Propeller 48103
Ultracast P-47 Thunderbolt Covered Wheels Diamond Tread 48123
Aeromaster The Wolf Pack Part IV Decals 48-660
Eduard P-47D-25 Thunderbolt Bubbletop 49240
References
Gabby: A Fighter Pilot’s Life, Francis Gabreski and Carl
Molesworth, Schiffer Publications, 1998. (Note: this book is the
same as a paperback, except the Schiffer book has lots of photos)