
Bill Freeman's Warbird "Su Su" in 1/48 scale
P-51D Mustang
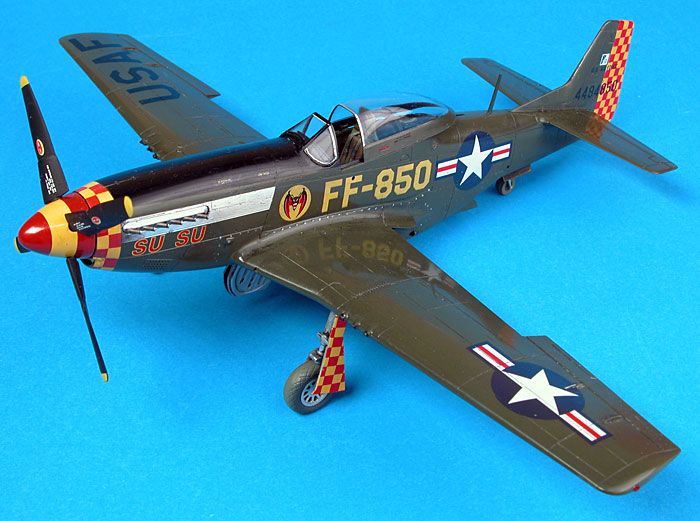
by Brett Green

Introduction
In 2004 we are privileged to see a surprising number of P-51D
Mustangs still flying 60 years after the veteran thoroughbred
rolled off WWII production lines. One of these Mustangs,
attractively restored to flying condition, is the P-51D "Su Su".
This airframe was originally recovered from Indonesia in 1978 and
passed through several hands before being purchased by Bill Freeman
in 1998. "Su Su" received its unique colours and markings at this
time, and it wears the same scheme today. "Su Su" is
currently owned by Anderson Aviation.
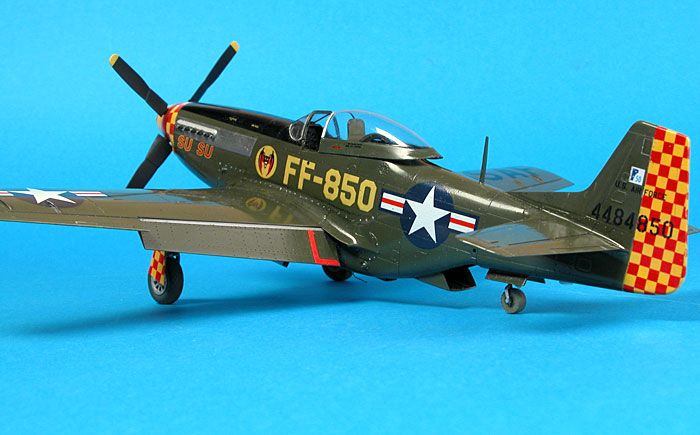
When Bill Freeman asked if I was interested in building "Su Su"
in 1/48 scale, I did not have to think about it for long.

Almost Straight
from the Box...
Tamiya's 1/48 scale P-51D Mustang is an almost viceless kit.
There are a few minor accuracy issues, but I wanted to build the kit
straight from the box and focus on the paint job.
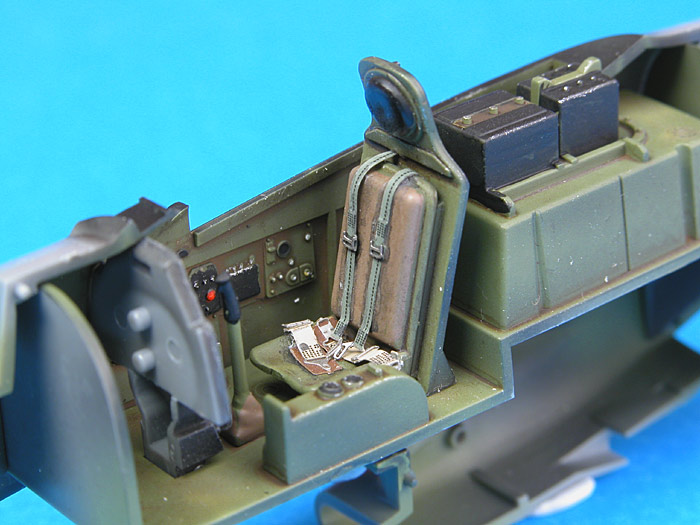
Construction commences in the cockpit. Sidewall detail is moulded
on the inside of the fuselage halves and the seat is simplified, but
careful painting produces an acceptable result. After spraying the
cockpit components Interior Green, I applied a wash of thinned Raw
Umber oil paint. The resulting artificial shadow adds depth to some
of the shallow cockpit features and also imparts a slightly grubby,
used appearance to the front office.
The only addition to the cockpit was a harness from Eduard's 1/48
scale USAAF/USN Color Photoetch Harness set. These photoetched parts
are pre-painted/printed and ready to use. Detail is fantastic. The
final effect is very realistic - right down to the stitching on the
straps.
Click the thumbnails below to view larger
pictures:
|
|

|
|
Except for the Eduard Color Photoetched harness, the cockpit was built straight from the box.
|
|

|
|
Tamiya's P-51D is a very quick build
|
|

|
|
Wheel wells were pre-shaded, painted then further weathered with a wash of thinned oil paint
|
|

|
|
The model fits together almost perfectly.
|
|

|
|
Almost perfectly. A few spots of filler were required under the big fuselage intake scoop
|
|
|
The warbird "Su Su" is not fitted with the bulky
WWII radio and battery behind the pilot but, in keeping with my
"straight from the box" approach, I did not alter this area.
A little extra time was spent painting and
weathering the wheel wells before main construction was begun.
There is almost nothing to be said about the
remainder of construction. This really is a classic "shake and bake"
Tamiya kit. A little filler was required underneath the big fuselage
intake, but there were no visible gaps or seams anywhere else on the
model.
A few short hours of assembling the main components
and the model was ready for paint.

A Glossy Warbird
 Paint
Paint
High gloss finish - three words to strike fear into the heart of
any military aircraft modeller. The flat finish on most warplanes
hides a multitude of sins. No such concealment is offered by high
gloss paint - just the opposite in fact. Every tiny blemish and
imperfection is amplified by the shiny smooth surface.
At first I suggested to Bill that I would paint "Su Su" in a
satin finish. I almost convinced myself that this would be a fair
representation of "scale sheen", but in my heart of hearts I knew
that I was simply scared of the scrutiny invited by high gloss. I
bit the bullet and decided to try to represent the mirror-like sheen
so obvious in the photos of the real aircraft.
A smooth base coat was imperative to provide a foundation for the
unforgiving finish. I mixed Polly Scale RAF Dark Green with around
30% Polly Scale Gloss. Polly Scale Gloss acts as an effective
thinner but also adds a useful sheen to the otherwise dead flat
Polly Scale acrylics.
One of the reasons that I like Polly Scale acrylics is because it
dries fast to a rock-hard finish that resists fingerprints and does
not wear off the high-traffic areas of the model (such as the
trailing edges of the wings) like some other acrylic paints.
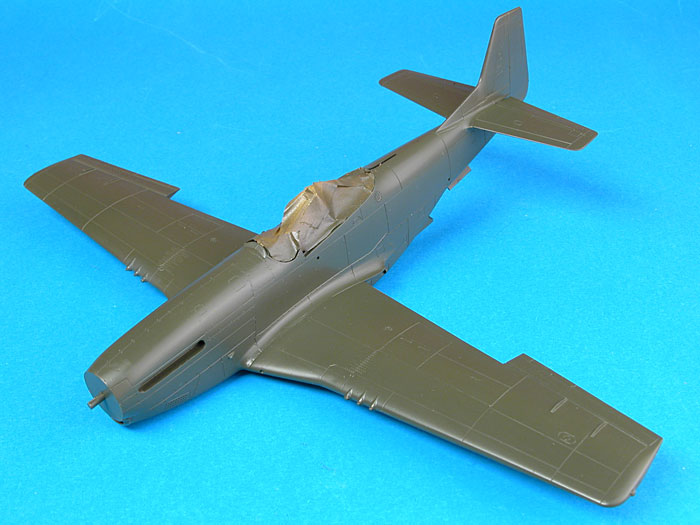
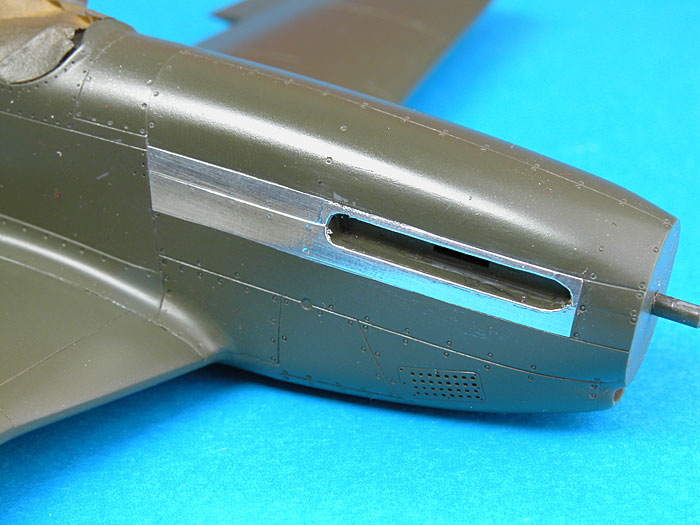
Self-adhesive aluminium foil was used for the
prominent metal panels around the exhaust. The foil was cut slightly
larger than the panels, then peeled from its backing paper and stuck
to the painted plastic. The foil was burnished into the panel lines
with a sharpened stick, and a new hobby knife blade was run around
the outline. The excess foil was then lifted off the model and
discarded.

Decals and Glossing Up
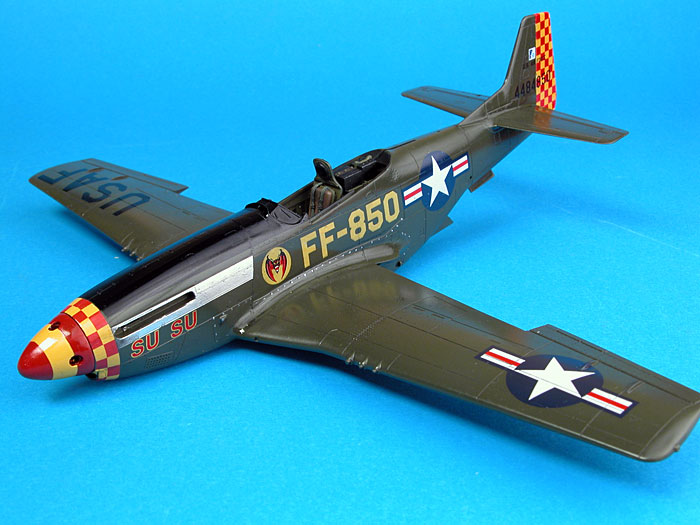
There were no commercial decals available for "Su
Su". I could use the 357th FG red and yellow nose checks from an
Aeromaster decal sheet, and I also had national markings and yellow
buzz numbers on sheets in my decal box, but Su Su's unique markings
simply did not exist in 1/48 scale.
Mike Grant Decals came to the rescue. I sent Mike
several photos of the aircraft and he created the tail and gear door
checks, the buzz numbers, serials, fuselage emblem and various
stencil markings - including the "Bill Freeman - Pilot" lettering on
the canopy. These decals are produced on an ALPS printer, so the
yellow markings were supplied with separate white backing to ensure
good colour saturation against the dark green background.
The glossy finish delivered by the base coat of
Polly Scale Dark Green and Clear Gloss was buffed in preparation for
the decals. I tackled the toughest decalling jobs first - the nose
checks and spinner stripe. First the spinner was painted a shade of
red to match the checks, then the yellow decal stripe was applied.
This settled down nicely after a generous application of Micro Sol.
The nose checks were similarly trouble free.
At this stage the undercarriage doors and the rudder were
painted gloss yellow in preparation for the red checks.
Mike Grant's decals were cut out of the sheet and
applied to the model. Apart from cutting them out, the method of
application is the same as any other decals. The white backing
decals were laid down first. I was careful to cut a slightly larger
outline around the white markings to avoid the carrier film from the
yellow markings overlapping the backing decals (I was worried that
this might cause silvering problems later). The precautions were
justified - no silvering on any of the decals.
National markings were sourced from a Cutting Edge
Skyraider decal sheet.
I spent some more time looking at reference photos
and realised, for the first time, that there was a black anti-glare
section on top of the nose. Although masking around the decals and
foil was a little harrowing, this major feature was added with no
ill effects.
Click the thumbnails below to view larger
pictures:
|
|

|
|
Aeromaster decals were used for the distinctive 357th FG checks on the nose. The Yellow spinner band was also from Aeromaster
|
|

|
|
The rudder was painted yellow in preparation for the red checks from Mike Grant Decals
|
|

|
|
Mike supplied a white background to his yellow markings to ensure good colour saturation against the dark green background
|
|
|

With the decals applied it was time to grit my
teeth and start glossing the model.
I sprayed the entire airframe with Future floor
polish. The first coat was a little patchy so I sprayed a
second. This covered better than the first attempt and was
certainly very glossy, but it gave the model a wet look - not
really what I was after. I lightly dry-sanded the surface of the
model with 4,000 grit Micromesh cloth, followed by polishing
with 8,000 grit.
Now the finish was looking better.
At this stage I brushed on a thin wash of black
oil paint. After drying overnight I wiped the excess off the
model, leaving a subtle residue in panel lines. However, to my horror, I
saw that I had not only removed the excess oil wash but also
several chunks of the custom decals!
Fortunately, Mike had supplied two sets of
decals. I reconstructed the buzz number and completely replaced
the port-side "Su Su", and half of the same decal on the
starboard side.
A final coat of Future sealed in the new decals.
The Micromesh cloths were once again used to smooth and polish
the surface.

Finishing Touches
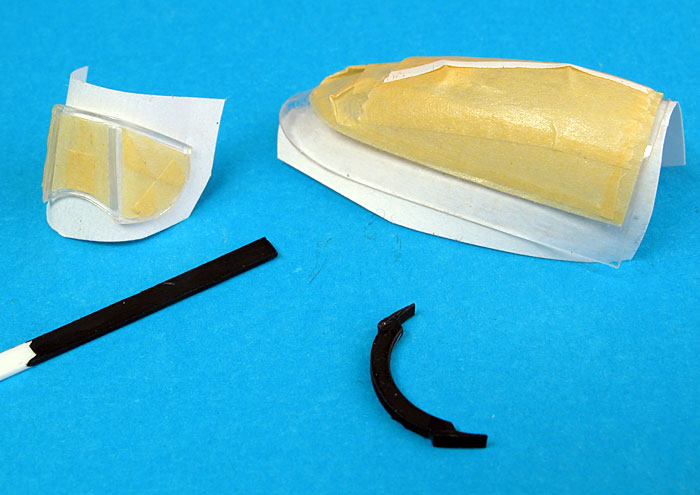
Perhaps the weakest aspect of Tamiya's P-51D
Mustang kit is the engineering of the sliding canopy section.
The clear "bubble" and the canopy base are supplied as separate
parts. It is almost impossible to join the parts without glue
marks and/or an obvious seam. I replaced this section of the
canopy with a vacform part from Squadron.
The arch-shaped brace was cut from the kit
canopy base using a pair of side cutters and trimmed to fit
inside the vacform canopy. This brace was later glued to the rear cockpit deck as a
mounting aid for the thin vacform part. I also cut two small
pieces of styrene strip, which were glued to the inside of the
canopy frame near the front as additional mounting points.
Click the thumbnails below to view larger
pictures:
|
|

|
|
The kit canopy has a difficult seam between the clear section and the frame. This part was replaced with a vacform canopy from Squadron.
|
|

|
|
All the components gathered for final assembly.
|
|
|

Thin strips of self-adhesive foil were attached
to the windscreen and the canopy, representing the bare metal
seen on the real aircraft. Once the clear parts were decalled
and foiled, I sprayed them with Future too.
I broke my "straight from the box" approach and
added a blade antenna, a trailing antenna and a small fairing behind
the tailwheel. All of these modern features were obvious in photos
of "Su Su". There was no gunsight visible in photos of the
aircraft, so this part was omitted.
The rest of the kit was assembled per instructions.

Conclusion
"Su Su" presented an excellent opportunity for me to try
something different - a high gloss finish.
The finish is by no means perfect, but if you squint
and look at it from just the right angle...
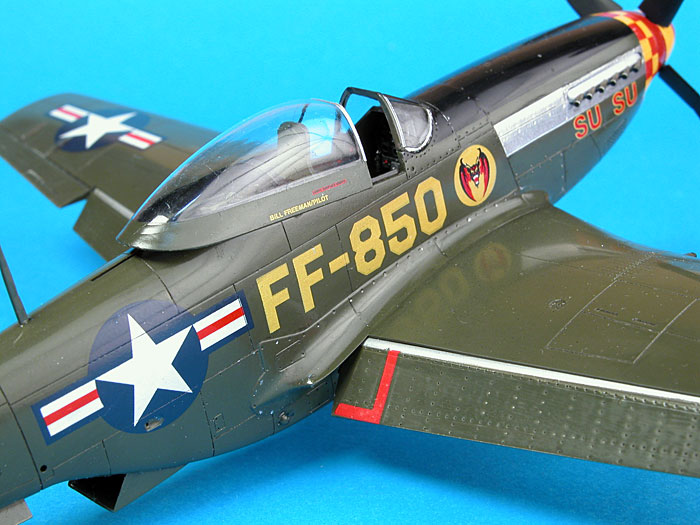
I found this to be an interesting and challenging
project. I will not fear a high gloss finish in the future - but I
will still show it a healthy respect!

More Pictures
Click the thumbnails below to view larger pictures:
Home
What's New
Showcase
Workshop
Products
About Testor
Search
Links


 Paint
Paint


